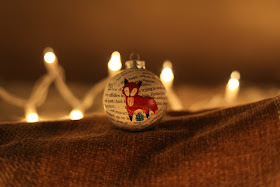
I’ve always loved the spirit invoked by hand-made ornaments. Store bought “perfect” ornaments are just so impersonal! These are a lot of fun to make, and are a great project for kids as well as more experienced crafters. Happy holidays everyone!
You need:
- Styrofoam balls approximately the same size as an average ornament.
- A Christmas themed book you don’t mind tearing up. Normally I hate the idea of hurting a book, but I forgave myself for this case because an old thrift store book was upcycled into a unique ornament that will last for decades to come.
- Two small paintbrushes – one for the Mod Podge, and one for painting your design.
- Mod Podge - matte finish and acrylic spray.
- Small paper cups.
- Ornament hangers/fasteners. I used some from cheap Wal-Mart ornaments, but I’m sure you can find them online. You can also substitute the metal hangers with a bit of looped twine.
- Craft or acrylic paint.
- Optional: glitter.
Step
One
I went through my book and tore out *cringes* several pages that had cute
Christmas related phrases like “Christmas tree,” “December,” “pumpkin spice
cake,” and “presents.” Some were less overtly Christmassy and just referenced
snow, woods, etc. I then tore the pages into strips. Most were about the width
of one line of text, but some were several lines thick.
Step Two
Next, you can apply the strips to the Styrofoam balls
with Mod Podge. I used little paper cups to hold up the balls, and I found that
applying the glue to the back of the strip was more effective than applying it
directly to the ball itself. I also learned that the paper in my book was
fairly thick, and didn’t want to curve without severe wrinkles. To combat this
issue, I made a series of short tears along the longest edges of each strip –
this allowed them to fold flat so that they could wrap around properly.
The third step is to create a stencil of the design
you’d like to paint. I modeled my stencils after several different designs I
saw online. As with the other tutorials we’ve done, draw or trace your design
on a sheet of paper, cut it out, and use a pencil to trace around the stencil
onto the ornament. Alternatively, you could try writing cute holiday words or
phrases onto the ornaments in cursive. I think they’d look really cute with
words like joy and peace.
Step
Four
Time to paint! I used acrylic
paint because it’s what I had on hand at the time, but basic crafting paint
would work just as well. After the paint had completely dried, I went back and
added glitter to a few areas. You can do this fairly easily using the Mod Podge
and a really small paintbrush.
Step
Five
After the paint has
completely dried, you can attach the ornament hanger. The ones I used had long
metal wires that I slid into the Styrofoam. I then secured them with a layer of
Mod Podge under the rim.
Step
Six
The final step is to spray your ornament with the clear acrylic spray. If you want a shiny finish, you’ll need to use several coats of the shiny (non-matte) spray. The paper soaks it up, so the only areas that are shiny after the first spray are the ones with paint. I used paper clips to hang the ornaments on a string outside. Note: If your initial coat is too thick, it may cause the paint colors to bleed a bit. You’ll want to start with an initially thin coat, and working your way up with appropriate drying time in between each layer.
The final step is to spray your ornament with the clear acrylic spray. If you want a shiny finish, you’ll need to use several coats of the shiny (non-matte) spray. The paper soaks it up, so the only areas that are shiny after the first spray are the ones with paint. I used paper clips to hang the ornaments on a string outside. Note: If your initial coat is too thick, it may cause the paint colors to bleed a bit. You’ll want to start with an initially thin coat, and working your way up with appropriate drying time in between each layer.


Super cute! :)
ReplyDeleteThank you!
DeleteThis will be fun to do with my grand daughters. Thank you so much!
ReplyDeleteI'm glad you enjoyed! I hope they will too.
Delete