
I hope you all are ready for this... Anthro Knock-off Week has officially begun! As I explained in the announcement a few weeks ago, I've joined four other bloggers to bring you 30 anthropologie knock-off tutorials in just seven days. Crazy right?! At the end of this post you can find photo links to today's other four projects as well as a link to our Pinterest board. To make things even more exciting, we'll be having a themed link party on Saturday! Stay tuned for new daily posts, and be sure to check out our other lovely bloggers.
I don't know about you, but this rhino bag makes me want to go on safari. What's even more exciting is how simple the tutorial is. Happy Crafting!
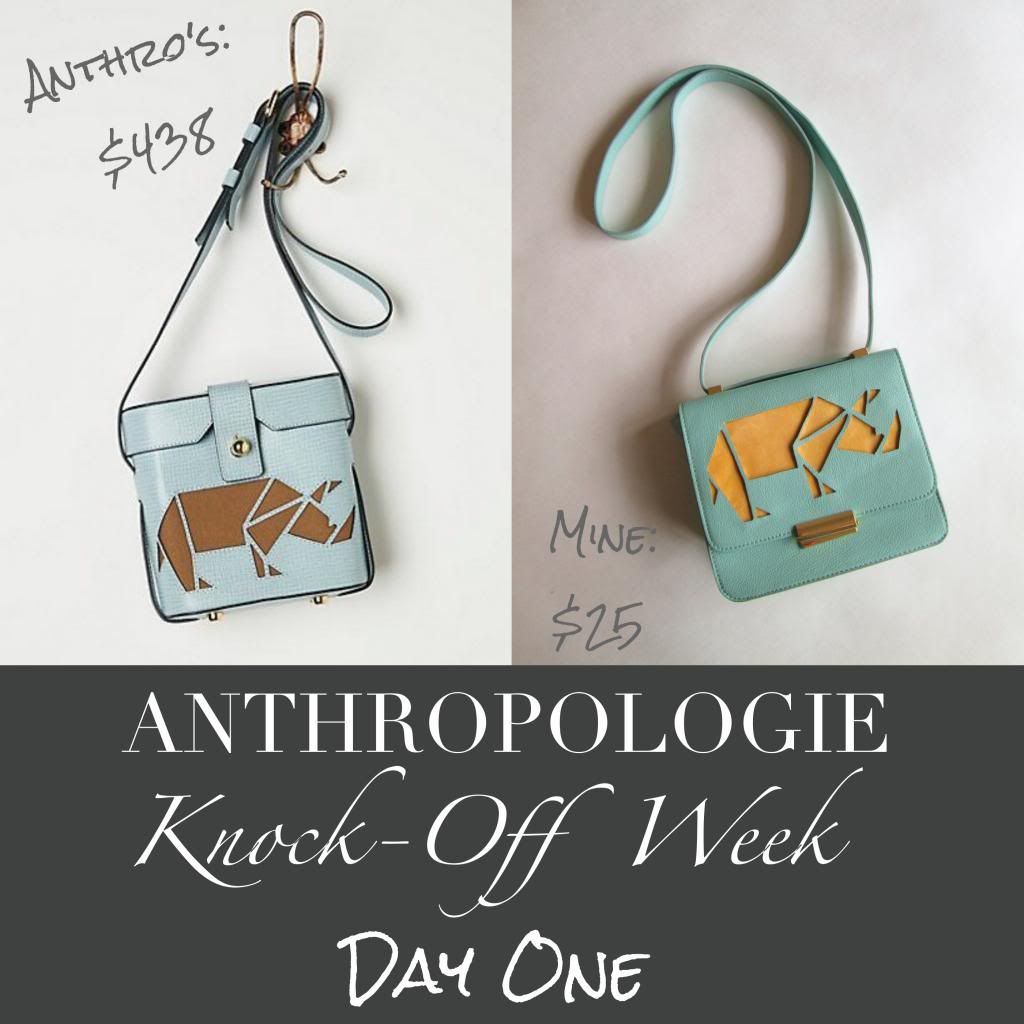
You need:
- Purse – I used this blue purse from Forever 21. It needs to have either a plain flap or a plain front panel without any embellishments. Clasps should be towards the bottom (like mine) or top, not in the middle. Alternatively, you can use a zip-up purse or a purse without any closures at all.
- Leather – My leather pieces came from a scraps package that I originally used for the Leather Coasters. It can be any color, texture, or thickness. Ideally you’ll use one large piece, but you can use several medium to small size pieces – it’ll just take a little more work to get them sized right so they line up without over lapping.
- Exacto Knife/Razor blade + Scissors.
- Glue – I used Aleene’s Fabric Fusion.
- Craft tape – it can be clear or blue painter’s tape, but try to avoid packing tape.
- Sharpie + Pencil.
- Paper.
- Bobby Pin.
Step
One
Begin by drawing your pattern on a sheet of paper. I
just zoomed in on the Anthro photo and then traced it. It can be any size you’d
like, but the gaps in between each cutout shouldn’t be smaller than ¼ of an
inch. When they get to that size, it becomes hard to cut and remove the
sections without stretching out the leather.


Step Two
After planning out the placement of the rhino,
cover that area of the purse in tape. Then, trace your design onto the tape
with the permanent marker. The tape will protect your purse from stray marker
lines, etc. If you make a mistake, it wont be as big of a deal as if you were
drawing directly on the purse. to keep spacing relatively even, I first traced the outside edges while all the pieces were still attached to one another, and then cut them apart to fill in the gaps.


Step
Three
Next, use your exacto knife
to cut out each shape, being sure to cut deeply enough to remove the piece
without going through the other side. Most faux leather is made of two layers, and you'll need to remove both. So on the backside (inside of purse/flap) there’s fabric, then a piece of
cardboard, and then a layer of faux leather, which is usually two in one. My
faux leather wanted to split in half, so I removed the top piece, and then cut
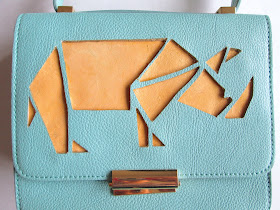
deeper to remove the second. You can see the second layer I'm referring to in the photo below. When you've cut all the way through, you should see cardboard or, if your purse doesn’t
have any (which is highly unlikely), the fabric that’s on the backside. If the newly cut edges are plain
white, you may want to color or paint them to blend in with the new leather you’ve
selected. I used a yellow sharpie.


Step
Four
Next, you can slide your sheet of leather into place
by going under the edges of each cutout. I used the biggest middle section as
my entry point, and used a bobby pin to slide the leather into all of the
corners until it laid flat and each hole was filled. It can be glued into place
with fabric glue. I put glue in-between the new leather and the cardboard, and in-between
the new leather and the original faux leather. Be careful not to apply too
much, as the glue tends to squish out, and you don’t want it to by visible. I
placed my purse under weight so it would dry flat.


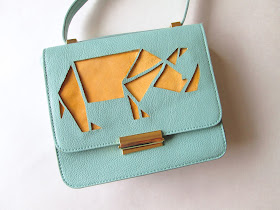
That’s it! I cleaned up my
edges a bit with the exacto knife so that they were cleaner.
This post is part of Anthropologie Knock-off Week! I've joined up with four other bloggers to bring you 30 fun Anthro themed tutorials. To see what our other bloggers have shared today, take a look at the photos below. Happy crafting!

This post was featured on Learning, Creating, Living, Flamingo Toes, Craft Dictator, The Idea Room, Whipperberry, SohoSonnet, Delineate Your Dwelling, Dream a Little Bigger, Yesterday on Tuesday, and House by Hoff.

Sorry ... commented with the wrong google account a second ago! Love this project! It turned out AWESOME! Just like the MUCH more expensive Anthro version!
ReplyDeletehaha that's okay Katie. Thank you! I'm really happy with it :)
DeleteWow! This is really impressive. I totally agree with Katie that it looks WAY more expensive than the Anthro version. Genius!
ReplyDeleteThanks Melissa! It's definitely my new favorite purse.
DeleteThis is amazing! One of the coolest projects I've ever seen. Love it so much!
ReplyDeletexo
Daniela
Put A Bird On It
Oh man thanks! I love your blog, so the compliment is extra special. :) Thanks for stopping by!
DeleteBrittany,
ReplyDeleteThis is SO amazing! I absolutely love it! Fabulous :) I like yours way more that Anthro's!
Dude, have you seen what you posted today? Amaze-balls. Definitely the best of the bunch. hehe thanks Angela! I'm so glad we teamed up together.
DeleteSeriously I am in love with this!! It is AMAZING!! You did such a good job, I would have never thought to try and make that project. You really went out of the box, awesome job!
ReplyDeleteAw thanks Sonnet :) The process was a little hard to figure out at first, but I hope I made the tutorial easy to follow. :)
DeleteThis is genius & amazing! I can't believe how easy it really is to make! Awesome job & thanks for sharing this at Link'n Blogs Link Party.
ReplyDeleteThanks Katelyn! Honestly, I couldn't believe how easy it was either! Thanks for taking the time to stop by.
Deletethat rocks.
ReplyDeleteThis was really really clever! Thanks as always for sharing at link it or lump it!
ReplyDeleteAmy @ http://www.delineateyourdwelling.com
Thanks for hosting a fabulous party Amy!
DeleteCongrats! I am featuring your amazing bag on our Link party today. ALSO you had the most views at our party!! Be sure to stop over and grab a feature button. http://www.delineateyourdwelling.com/2014/05/link-it-or-lump-it-party-36.html
DeleteOh wow, thanks so much for letting me know! That's super exciting. :)
Deleteno bad, article very good
DeleteWow I'm always amazed at what people come up with. I would have NEVER thought of this but I love it! Super cute! I'm picking you as my feature for the Link'n Blog linky party this week.
ReplyDeletewww.stripesandpolkadotsblog.com
Oh no way! Thank you Hanna! That's super exciting.
DeleteYou've been featured at Link'n Blogs link party! Way to go! Stop by to see your feature and link up again. :)
ReplyDeletehttp://iputabirdonit.blogspot.com/2014/04/linkn-blogs-23.html
xo
Daniela
Put A Bird On It
Thanks for letting me know! I'll be sure to go take a look. :)
DeleteWow, you did an awesome job!! Thanks so much for linking up to Handmade Tuesdays @ Ladybug Blessings! www.ladybug-blessings.com
ReplyDeleteThanks for hosting a fun party!
DeleteFound you via Made in a Day! Lovely blog:) I <3 your knock-offs! Pinning
ReplyDeleteThanks for taking the time to visit me here, and thanks for sharing on Pinterst!
DeleteThat's quite possibly the cutest rhino I've ever seen. Love the bag, love the gold details.
ReplyDeleteI thought so too! The minute I saw Anthro's version, I just knew I had to try it.
DeleteAwesome job! Love it!
ReplyDeleteI love this kind of project, when I see the picture and can't wait to click through to see how you did it! I have some faux leather left over from another project and was thinking of trying to make a bag, this sort of cut out embellishment would be great if I can pull it off! Thanks for the lovely idea.
ReplyDeleteI'm so flattered - I love hearing that readers enjoyed my posts. Good luck! I'd love to see how your version turns out.
DeleteI LOVE this knockoff! this is so fabulous, in fact this whole series has been soooo inspiring! Pinned :)
ReplyDeleteOh awesome, I happy to hear that you've been inspired :)
DeleteThis is amazing!!! I love it! There are so many options with other geometric animal shapes - wonderful project!
ReplyDeleteBrynne I've already been thinking about a follow-up project with other designs - I just love the way it looks. :) Thanks for stopping in!
DeleteYou did such a good job! I love your tutorial too--I would have no clue how to do this before you shared this. Thanks for linking up to the Bloggers Brags Pinterest Party. I've pinned your post to the Bloggers Brags Pinterest Board
ReplyDeleteThanks Tammy! And thanks for sharing on Pinterest :) I always look forward to the Bloggers Brag Party.
DeleteThanks so much for sharing this amazing project at Project Inspire{d}! You are featured this week.
ReplyDeleteOh awesome, thanks so much for letting me know! I'll be sure to keep an eye out for the post.
DeleteGreat DIY!
ReplyDeleteVery clever!
xoxo
Veva
Oh thank you Veva!
DeleteYour blog provided us with valuable information to work with. Each & every tips of your post are awesome. Thanks a lot for sharing. Keep blogging,
ReplyDeleteCircle Bag
Hey Very Nice Blog!!! Thanks For Sharing!!!!.
ReplyDeleteThank you so much for sharing this informative blog with us, this was really amazing and I’m really thankful to you.
ReplyDeleteaudio engineering course
This comment has been removed by the author.
ReplyDeleteI am sure this piece of writing has touched all the internet visitors, its really really pleasant post on building up new webpage. great blog article.Really looking forward to read more. 카지노사이트
ReplyDeleteNicee!Appreciate it! An abundance of posts. Thanks for ones marvelous posting! I really enjoyed reading it, you might be a great author. 룰렛
ReplyDeleteThanks for sharing with us this important Content. I feel strongly about it and really enjoyed learning more about this topic. 텍사스홀덤
ReplyDeleteI was more than happy to uncover this great site. I need to thank you for your time due to this fantastic read!! 온라인카지노
ReplyDeleteGreat job. Looking to read this next post. Thanks 바카라사이트
ReplyDeleteI high appreciate this post. You’ve nailed it! update this blog with more information. 카지노사이트
ReplyDeleteI like this post. quite informative blog. Keep blogging.. thanks 온라인카지노
ReplyDeleteIt’s always useful to read content from other authors, Thanks to this 바카라사이트닷컴
ReplyDelete"first rate facts sharing .. I'm very glad to have a 메리트카지노주소
ReplyDeleteit's far a totally exciting weblog publish. I often visit 안전놀이터
ReplyDeleteSuitable perform! I extremely loved the standard information an character offer in your traffic? Is gonna be returned regularly so that you can investigate new posts 토토 배너 순위
ReplyDeleteThanks for sharing LOCKSMITH YORK
ReplyDeleteHi, thank you so much for sharing this, it is extremely useful. Thanks again 메이저사이트
ReplyDeleteThanks for sharing this information. 안전놀이터
ReplyDelete매우 유쾌한 기사, 먹튀검증
ReplyDelete나는 이것을 지지자들에게 트위트해야합니다. 매우 감사! 토토사이트 추천
ReplyDeleteYou delivered such an impressive piece to read, 스포츠중계
ReplyDelete이 훌륭한 정보를 갖고 싶습니다. 난 그것을 너무 좋아한다! 무료스포츠중계
ReplyDelete많은 사람들에게 이것은 중요하므로 내 프로필을 확인하십시오. 스포츠중계
ReplyDelete이 멋진 정보를 얻게되어 정말 감사합니다 먹튀검증
ReplyDelete이 목표에 도달했을 때의 . 링크모음
ReplyDeleteGood content. You write beautiful things.
ReplyDeletesportsbet
vbet
vbet
taksi
hacklink
korsan taksi
sportsbet
mrbahis
mrbahis
This post is on your page i will follow your new content.
ReplyDeletecasino siteleri
sportsbet giriş
mrbahis
betgaranti.online
sportsbetgiris.net
sportsbet
mrbahis.co
mrbahis giriş
casino siteleri
I really enjoy simply reading all of your weblogs. Schlüsseldienst Helmstedt
ReplyDeleteslot siteleri
ReplyDeletekralbet
betpark
tipobet
betmatik
kibris bahis siteleri
poker siteleri
bonus veren siteler
mobil ödeme bahis
AFXD8
The blog was informative. keep posting more.Estate Planning Lawyer
ReplyDeleteetiler
ReplyDeletegaziemir
afyon
bahçelievler
bingöl
OHKJ1E
van
ReplyDeleteçekmeköy
kepez
manavgat
milas
AY5
fethiye
ReplyDeletekağıthane
kuşadası
maltepe
şirinevler
AVJDQU
The global warming community has one of the best weight-loss ideas out there and they don't even realize it. If you live within walking distance of work or the store or even of school, don't jump in a vehicle for convenience. Just walk! You'd be amazed at how much weight you can lose over time by just walking.
ReplyDeletehttps://www.outlookindia.com/outlook-spotlight/phenq-reviews-do-these-weight-loss-pills-work-ingredients-benefits-side-effects-discount-code-news-315150
It Is Good Articles.
ReplyDeleteAnticipating understanding more. Excellent article Much thanks once more. Need more.
ReplyDeleteo me. Thanks ! 늑대닷컴
ReplyDelete안녕하세요. GOOGLE을 사용하. 토토사이트추천
ReplyDelete안녕하세요. GOOGLE을. industrial outdoor storage real estate
ReplyDelete팁들 주셔서 감사합니다. . 포커 뷰어 프로그램
ReplyDelete감동 받았습니다. 아주 드물게 포커 뷰어 프로그램
ReplyDeletePostingan yang luar biasa, dan situs yang luar biasa. Terima kasih atas datanya! slot gacor
ReplyDeletehttps://www.ustechtips.com/2017/12/best-seo-6-ways-to-optimize-your-blog.html?sc=1724223033407#c2899356917362627461
ReplyDeleteشركة تسليك مجاري بالاحساء c574qOZwc5
ReplyDeleteشركة مكافحة حشرات بالاحساء 2jzJenpYB5
ReplyDeleteشركة عزل اسطح بالجبيل
ReplyDeleteyQAt8Cej3o
شركة تسليك مجاري بالقطيف
ReplyDelete8kGVGeRoZz
شركة مكافحة حشرات بالاحساء
ReplyDeleteabw7H