

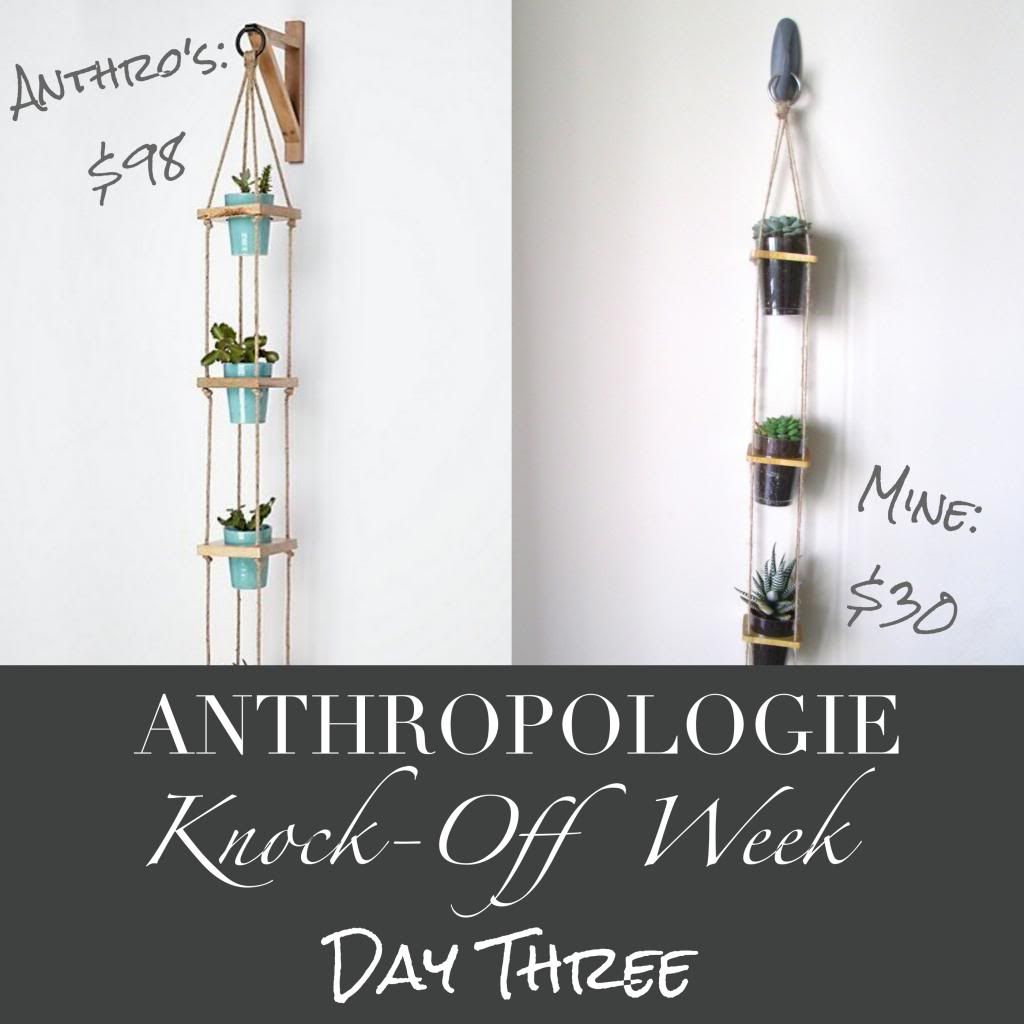
My project today is this simple rustic hanging planter. I love that it's both suspended from the wall and composed of multiple pots. I stuck with the original four pot design, but don't be afraid to mix it up a little. At the end of my tutorial, you can find photos and links for our other 4 bloggers' projects.
You need:
- Four wood bangles – I’m referring to the wood bracelets that were super popular about ten years ago. I found a great deal at this Etsy shop – they have two different varieties, low prices, and my package arrived super quickly.
- Four pots or cups – they need to fit inside the wood pieces, so you may want to purchase these after the wood pieces. Note: If you are using a temporary hanging method (I'm using an outdoor 5 lb Command Strip hook), you should probably go with lighter weight (i.e. plastic) cups/plant containers. I found some really cute colored glasses that fit perfectly, but they added another 2 lbs to the totally weight. If you choose to go with ceramic or glass, you should probably make sure you have a heavy duty hanging method.
- Metal ring.
- Twine. SecureLine's Twisted Jute Twine with 7lb safe working load is the perfect size and strength.
- Adhesive – I used Gorilla brand super glue (not the foamy stuff... Avoid that)
- Needle + Thread.
- Scissors.
- Ruler + Pencil.
- Sharpie.
- A drill or someone who can do a little drilling for you.
Step
One
To begin, we’ll need to drill a hole in the
corner of each wood bangle. I’m not so handy with tools, so my brother helped
me out. We found it easiest to mark one bangle with hole placements, and then
clamp three together to drill. We then used the same top (marked) bangle as a
guide to drill the last one. We used a 3/16 drill bit.

Step Two
This step can be skipped if your wood is
already varnished. If it’s raw, I recommend using an outdoor spray-on varnish. I
did a total of four layers on each wood piece. I LOVE the spray because it’s
super easy and there’s no clean-up. Just throw down some paper towels and spray
away. Warning: try really, really hard to avoid getting it on your hands. My
left hand ended up getting sprayed while I was doing the edges, and it stayed
sticky for hours! Soap and water, nail polish remover, and a scrub brush didn’t
help even slightly. I just had to let it wear off.
Step
Three
Now we’ll begin assembly. Cut four 47 inch
pieces of twine. Note: this is the minimum size. You can cut bigger pieces to
give yourself more wiggle room. Tape the end of each piece of twine to make it easier to pass through the holes.

The rest of step three is going to be broken down into mini
steps:
1. Tie a double knot at the end of each piece of
twine,
about half an inch from the edge. It’s important that
they’re as even as
possible.

2. Slide on the first bangle all they way down
until it hits
the knots.
3. Measure 9½ inches from the first wood bangle on
each
piece of twine, and mark it with the sharpie.

4. Tie another double knot in each piece of twine.
The
sharpie mark should end up in your knot. This won’t be
perfectly exact
(even Anthropologie’s is slightly
uneven), but should be pretty close to even.
Try to
make sure that you’re tying your knots the same way
every time. I kept
changing it (who knew you could tie
the same knot 50 different ways) and they
ended up
really uneven, so I had to undo them and start over.

5. Slide the second bangle on all they way down
until it
hits the new knots.
6. Measure, tie, and repeat.
When you get to the last bangle, stop tying
knots and move on to the next step.
Step
Four
Now we're going to connect the twine to the ring by folding it over the ring and securing it with both thread and adhesive. I figured out placement, and used painter's tape to hold them in place.

Then, I stitched them together using a regular ole needle and thread. Note - you'll need to tie any knots much larger than normal, because a regular double knot will slip right through the twine. I went across all four pieces with fairly small stitches, and then back across in the opposite direction. I did this MANY times - until I was confident it would hold. I went around the side edges, over and through previous stitches, and even vertically across my horizontal stitches. It needs to be super strong, so I stitched until I had a solid line of white. It doesn't matter how pretty it is or isn't - we'll be covering it up anyway.
 Step Five
Almost done! I covered the stitched section of twine with Gorilla super glue, and wrapped another short piece of twine around it three times. Once the glue was dry, I removed the tape and cut off all the extra bits.
I planted four succulents, but this would also be a cool way to do an herb garden. I may just have to make another one! Below, I've provided pictures to show you what it looks like with blue or clear cups. I personally really like the clear cups, as it adds another natural/rustic element.


Now we're going to connect the twine to the ring by folding it over the ring and securing it with both thread and adhesive. I figured out placement, and used painter's tape to hold them in place.
Almost done! I covered the stitched section of twine with Gorilla super glue, and wrapped another short piece of twine around it three times. Once the glue was dry, I removed the tape and cut off all the extra bits.
I planted four succulents, but this would also be a cool way to do an herb garden. I may just have to make another one! Below, I've provided pictures to show you what it looks like with blue or clear cups. I personally really like the clear cups, as it adds another natural/rustic element.
I ended up hanging my planter on my balcony close to the ground. We have some really evil squirrels and I didn't want to risk them knocking it down. It's low enough that the bottom pot is actually resting on the ground (which is why the twine in the section isn't pulled straight).


And you all probably know by now that I have a succulent obsession...
This post is part of Anthropologie Knock-off Week! I've joined up with four other bloggers to bring you 30 fun Anthro themed tutorials. To see what our other bloggers have shared today, take a look at the photos below.


You ladies are so creative, this series is AMAZING! I love how this planter turned out and those succulents are so adorable! Pinned :) I hope you will stop by and share this over at The Makers link party going on at my blog, UpcycledTreasures.com.
ReplyDelete~Katie
I'm so happy to hear you're enjoying the event! Thanks for sharing, and I'll be sure to stop by your party too. :)
DeleteI just came across the Anthropologie Knock-Off series through The Makers link party. I love seeing ideas like this! I will definitely be following along (and maybe trying my hand at some of these DIYs as well!
ReplyDeleteThank you for sharing!
Alex @ Lavender's Blue
lavendersbluee.blogspot.com
Awesome Alexandra, I'm so glad to hear that. I hope you enjoy all of our posts!
DeleteGORGEOUS!! Wow, your projects are seriously amazing Brittany!
ReplyDeleteThanks Sonnet!
DeleteHow fun is this!!!! I love the idea of using bangles.... You are so resourceful!! :)
ReplyDelete“hugs” Crystelle
Crystelle Boutique
Oh thanks Crystelle! I really wanted to make it an easier tutorial, and after some brainstorming, this is what I came up with. :)
DeleteAwesome, Brittany!! I NEVER would have thought to use Bangles! I really wanted to make this, too, but I just couldn't come up with any ideas as to HOW! Great job!
ReplyDeleteThanks Katie, I'm so, so glad to hear that people are enjoying this tutorial. :)
DeleteI love all of your ideas! This one looks so lovely, I'll definitely be trying it out :) x
ReplyDeleteThank you Charlotte!
Delete